Management Assistance Program
Time-Saving Microsoft Word Customizations and Tools
By Jim Calloway
Often there are easier ways to do our everyday tasks, but we can’t use more efficient techniques if we do not know about them.
TRACK CHANGES
One of those efficiencies is using Track Changes in Microsoft Word. When many lawyers make final edits on a document, they print it off and make their edits with a pen. Using Track Changes allows you to see all changes that have been made together with the original text. You then accept or reject each change. This can be tedious with a document with many changes, but the payoff is when you are finished, you have the final version. With the hand-written changes, you have to review the document again once the handwritten notes have been followed. (And, yes, sometimes it is frustrating to click exactly on a period when it the only change.) Do an internet search for “track changes in Word” to see more details from Microsoft.
EMAILING DOCUMENTS
One task we do frequently is proofreading a document and then distributing the document via email. You have just completed proofreading, editing or composing a document in Microsoft Word and now you need to email it to someone.
Many would use these steps:
- Save the document using File-Save
- Either minimize Word to find Outlook or open Outlook from the Taskbar
- Open a blank email
- Browse to locate the file and attach it to the email
- Complete the email and send
Here’s how you should be doing it:
- Click the Save Icon in the Quick Access Toolbar
- Click the Email Icon in the Quick Access Toolbar (which opens a blank email with the file already attached)
- Complete the email and send
It isn’t just that there are three steps instead of five that saves time. Steps 1 and 2 in the second example literally take one second each. How long might it take to browse a folder to select the correct Word file?
QUICK ACCESS TOOLBAR
Not only is the Quick Access Toolbar (QAT) one of the most time-saving tools in Microsoft Word, but it is easy to customize. Let’s look at how to do this customization and icons you likely want to add to your QAT.
Where is my QAT? By default, it is at the very top of your screen in Word, right above the Menu Bar (that bar contains the words Menu, Home and Insert) and the Ribbon. It begins with the Save icon that looks like a floppy disk.
CUSTOMIZING YOUR QAT
If you now use the QAT, leave it there but if you haven’t used it, I strongly suggest that your very first customization is right-clicking on the QAT and selecting Show Quick Access Toolbar below the Ribbon. We are going to add several items to it and having it right on top of your document below the Ribbon will remind you of all the time-saving tools you have stored there for your convenience.
Save As Icon
So, the Save icon is there by default. Let’s add “Save as,” the command we use to save the document with a different name.
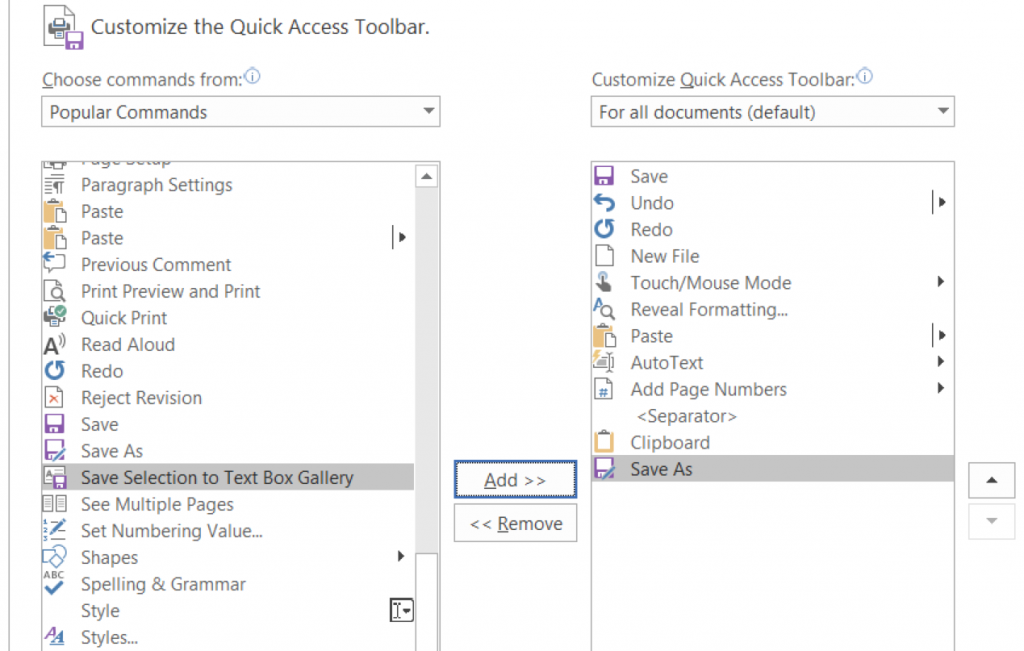
First you right-click on the QAT and select Customize Quick Access Toolbar. Here you find two columns of commands. The right-hand column is a list of all commands currently on your QAT. The left-hand column defaults to Popular Commands, but the drop-down menu gives you other options like All Commands and Commands Not in Ribbon.
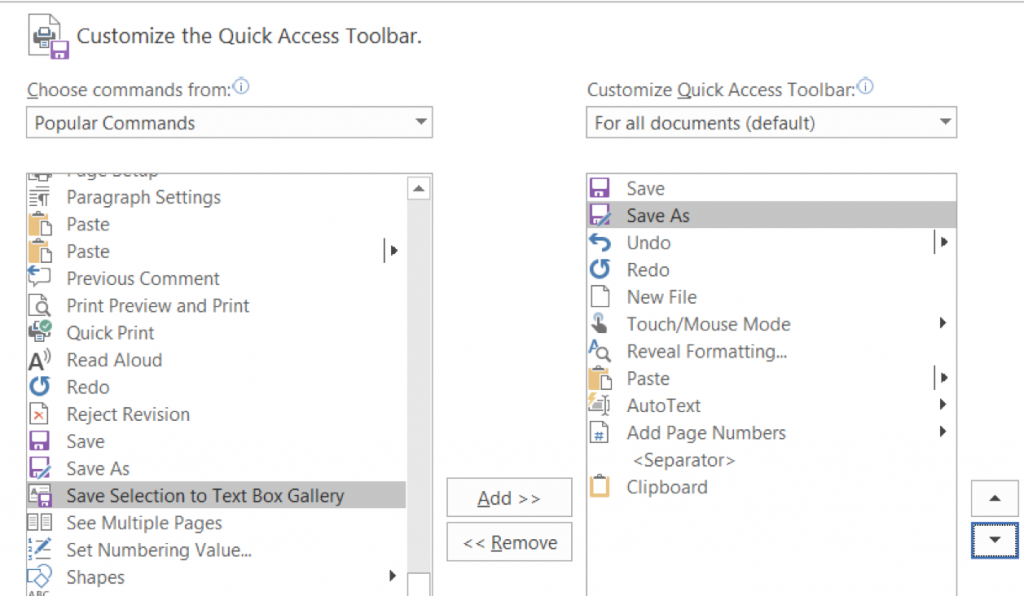
So, scroll down the list to the letter S and select Save As (see Figure 1). Use the Add button between the two windows to add to the QAT. But we aren’t finished yet. The Save icon and the Save As icon look very similar. So putting them next to each other makes perfect sense. Select Save As in the list at the right and then use the arrow keys on the far right to move it up next to the Save icon (see Figure 2).
Email Icon
Just to make certain you have it down, let’s repeat this exercise with that most time-saving icon I discussed at the beginning of this article, the email icon. Just follow the same steps.
Speak Icon
Next let’s add one of the more esoteric, but useful functions that many readers have never used. For this one, you need to use the drop-down menu to change Popular Commands to All Commands. Now scroll down to the letter S again. (Scrolling down through this much longer list also demonstrates the huge number of operations you can add to your QAT.)
This time select Speak with its cartoon speech bubble icon. Add it to the QAT. If you have been doing these exercises with a blank document, open a document with some text in it (or just type a sentence), highlight a sentence and click the Speak icon. The computer will read the document aloud to you, which may be just the thing for tired eyes at the end of a long day.
Clipboard Icon
Let’s try one more command because this one is very powerful. Clipboard is located under All Commands, not Popular Commands. Everybody who uses Word understands copy and paste, but many do not understand that up to 24 items you have copied are still available for pasting into a document. Putting Clipboard on your QAT allows you to easily access all of the 24 saved items and insert them in your document. If you are drafting a contract, for example, and are pasting in the document many of the same terms repeatedly, this function can save you a significant amount of time.
Right-Click or Arrow Expander
Some Microsoft Word power users have probably noted that I have used the right-click on the QAT method when there is another way to do this by clicking on the small downward pointing arrow on the right side of the QAT to access these functions. Using the right click method seemed to be the simplest way to explain things, but you can certainly use that arrow expander for your other customizations.
MORE HELPFUL TIPS
If you routinely use a number of other functions, you should probably add as many functions to the QAT as make sense for you, but don’t worry that you won’t remember what all of the icons on the QAT mean. You can just hover your cursor over each one to see the name of the command. Or you can just run a function. If you don’t like what happened, you can undo the action by clicking the undo button on the QAT. I’ve been using the keystroke combination CTRL + Z to correct my mistakes for so long I never use the undo button, even though it is on my QAT. Here are some other additions to the QAT that I routinely use.
AutoText
AutoText allows you to insert the text you have saved in various Quick Parts. If you’re not using Quick Parts, you’re missing another opportunity to save time by inserting large blocks of routine text in a pair of clicks. Learn how to use Quick Parts by watching our video “Fun with Microsoft Quick Parts” in the OBA Management Assistance Program Video Vault at www.okbar.org/members/MAP/videos.
Add Page Numbers
Since I draft a lot of CLE papers that require page numbers, I have this function on my QAT.
Macros
When you were choosing between Popular Commands and All Commands, you may have noticed that macros is another option under the drop-down menu. Any macros you normally use can also be launched from the QAT. If you are not using any Word macros, that is a topic for another day, but you are missing out on using a powerful document assembly tool you already own.
Reveal Formatting
Reveal Formatting allows you to look at the formatting applied to text you select. It also has the option to show all formatting marks within a document. Many power users leave the formatting marks on all the time. WordPerfect users will be quick to note this isn’t the same as reveal codes, but it can certainly be helpful when you are confused as to what formatting Microsoft Word is using.
Styles
As we all now understand, while WordPerfect uses hidden codes within the lines of text for formatting, Word uses formatting contained in Styles, which are applied to lines, paragraphs or documents. One key to being a Word power user is using Styles appropriately. For most, it is easier to learn about Styles with a training video for your version of Word so you can type along. Searching will locate lots of free videos, although many of them will also try to sell you a full-blown class on Word.
Status Bar
One more quick customization is adding functions and information displays to your Status Bar. The Status Bar is the gray bar at the bottom of the document. If you haven’t customized it, it is mostly all gray. Right click on the status bar and you will see many options for customization. Just check them all. (Yes, check everyone.) Don’t worry that the Status Bar will be too crowded as most of them will only display in a certain context.
Now your Status Bar displays information about your document that was invisible previously, but the real power behind this change is you can now toggle Track Changes off and on from the Status Bar instead of having to go locate the function under the Review tab in the Menu Bar. For more information on the Word Status Bar, Attorney at Work has a nice video by Deborah Savdra at www.attorneyatwork.com/video-customizing-status-bar-microsoft-office. Ms. Savdra runs the Legal Office Guru blog.
FREE TUTORIALS
My parting tip is to remind you that free tutorials to learn how to do these and many more customizations of Microsoft Word are available online. Just type into the search engine of your choice something like “customizing the Quick Access Toolbar in Word 2016” to find assistance for your customizations.
![]()
Mr. Calloway is OBA Management Assistance Program Director. Need a quick answer to a tech problem or help solving a management dilemma? Contact him at 405-416-7008, 1-800-522-8065 or jimC(at)OKbar.org. It’s a free member benefit!
Originally published in the Oklahoma Bar Journal — February, 2018 — Vol. 89, No. 5